Створення вашого власного проіложенія на мові C
- Попередня обробка
- компіляція
- Зв'язування (компоновка, лінковка)
- Час виконання
- Visual Studio
- Додавання файлів вихідних кодів в проект
- Додавання каталогів включення файл
- Зв'язок з бібліотекою
- Збірка, запуск і налагодження
- QtCreator
- Створення нового проекту
- Додавання файлів вихідних кодів в проект
- Додавання каталогів включення файл
- Зв'язок з бібліотекою
- Збірка, запуск і налагодження
- XCode
- Створення нового проекту
- Створення нового проекту
- Додавання файлів вихідних кодів в проект
- Додавання каталогів включення файл
- Зв'язок з бібліотекою
- Збірка, запуск і налагодження
- make
- gcc
- Visual Studio - fatal error C1083: Can not open filetype file: 'GL / glew.h': No such file or directory
- GCC - fatal error: GL / glew.h: No such file or directory
- Visual Studio - error LNK2019: unresolved external symbol glfwGetWindowParam referenced in function main
- GCC - main.cpp: undefined reference to `glfwInit '
- I set everything right, but I still have an "unresolved external symbol" error!
- I have a linker error with _imp_glewInit or some other symbol that begins with _imp
- I have some other weird problem with GLFW
- I have another linker problem! Help me, I'm stuck!
- My program crashes!
- I do not even go inside main ()
- My program crashes on glfwOpenWindow (), or any other function that creates an OpenGL context
- My program crashes on the first OpenGL call, or on the first buffer creation
- My program crashes when I try to load some file
- Something else is wrong
Було зроблено багато зусиль, щоб ці керівництва були простими для компіляції і запуску, наскільки це можливо. На жаль, це означає, що CMakes приховує, як це зробити у вашому власному проекті.
Отже, це керівництво пояснить, як створити на мові C власний додаток з нуля. Але спочатку вам потрібно знати, що робить компілятор.
Будь ласка, не пропускайте перші два розділи. Якщо ви читаєте це керівництво, то вам, ймовірно, потрібно знати цей матеріал.
Попередня обробка
Тут пояснюється про всі ці #defines і #includes.
Попередня обробка - це дуже просте завдання: копіпаст (вирізати-та-вставити).
Коли препроцесор бачить наступний MyCode.c:
#include "MyHeader.h" void main () {FunctionDefinedInHeader (); }
, Він просто відкриває файл MyHeader.h, і копіює його вміст в MyCode.c:
// Початок MyCode.c // Початок MyHeader.h #ifndef MYHEADER_H #define MYHEADER_H void FunctionDefinedInHeader (); // Declare the function # endif // Кінець MyHeader.h void main () {FunctionDefinedInHeader (); // Use it} // Кінець MyCode.c
Аналогічно, працюють #define и - виробляють підстановки, #if и аналізують і видаляють невикористовувані блоки, і т.д.
В кінці цього кроку у нас є попередньо оброблений файл C ++ без будь-яких #define, #if, #ifdef, #include, готовий до компіляції.
Як приклад, ось файл main.cpp 6-го керівництва, повністю попередньо оброблений в Visual: tutorial06_preprocessed . Обережно, це величезний файл! Але знайте, що такий простий .cpp побачить компілятор.
компіляція
Компілятор перетворює код C ++ в уявлення зрозуміле центрального процесора. Наприклад, наступний код:
буде перетворений в це: опкоди (коди операцій процесора) x86
mov dword ptr [i], 3 mov eax, dword ptr [i] lea ecx, [eax * 4 + 2] mov dword ptr [j], ecx
Кожен .cpp файл компілюється окремо і отриманий двійковий код записується в .o / .obj файли.
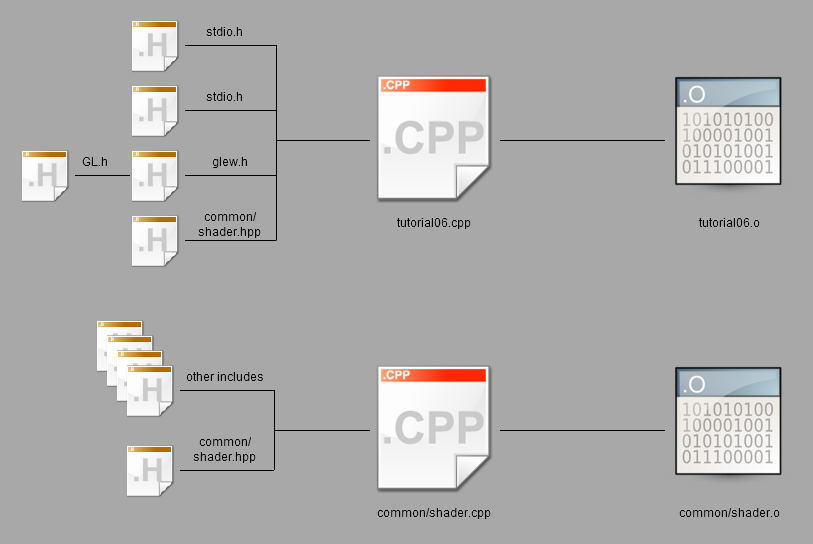
Зауважте, що у нас до сих пір немає виконуваного файлу: залишився останній крок.
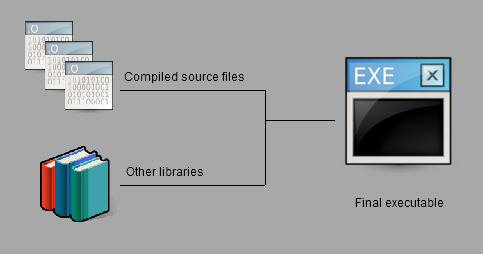
Зв'язування (компоновка, лінковка)
Компоновщик бере все двійкові коди (ваші і з зовнішніх бібліотек) і створює кінцевий виконуваний файл. Кілька зауважень:
- Бібліотеки маю розширення .lib.
- Деякий бібліотеки статичні. Це означає, що .lib містить всі необхідні x86 опкоди.
- Деякий бібліотеки динамічні (також кажуть колективні). Це означає, що .lib не містить коду x68; вона просто говорить: "Обіцяю, що функції Foo, Bar і WhatsNot будуть доступні під час виконання".
Коли компоновщіх закінчить роботу и вас буде виконуваний файл (.exe в Windows, .nothing_at_all s unix):
Час виконання
Коли ви запускаєте виконуваний файл ОС відкриває .exe і поміщає все x68 опкоди в пам'ять. Як було сказано раніше, деякий код недоступний в цей момент: код з динамічних бібліотек. Але компоновщіх був досить гарний, щоб сказати, де шукати цей код: в .exe чітко сказано, що функція glClearColor реалізована в OpenGL32.dll.
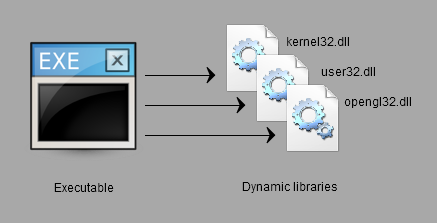
Windows з радістю відкриє .dll і знайде glClearColor:
Іноді .dll не може бути знайдена, наприклад, через переривання процесу установки, і програма просто не може бути запущена.
Інструкції по створенню OpenGL додатки розділені на послідовні базові операції. Це зроблено навмисно:
- По-перше, вам доведеться це робити постійно, так що краще гарненько в цьому розібратися
- По-друге, ви будете розуміти що ставитися до OpenGL, а що ні.
Visual Studio
Створення нового проекту
Файл -> Новий -> Проект -> Порожній проект (ориг. File -> New -> Project -> Empty project). Чи не іспользуйзуете майстер. Не використовуйте будь-які опції, про я их не знаєте (відключіть MFC, ATL, попередньо скомпільовані заголовки, stdafx, main файл).
Додавання файлів вихідних кодів в проект
Клацніть правою кнопкою миші по Файли вихідного коду -> Додати новий (ориг. Source Files -> Add new).
Додавання каталогів включення файл
Клацніть правою кнопкою миші по проекту -> Властивості -> C ++ -> Загальні -> Додаткові каталоги включення файл (ориг. Project Properties -> C ++ -> General -> Additional include directories). Це, по суті, що випадає, який ви можете легко змінити.
Зв'язок з бібліотекою
Клацніть правою кнопкою миші по проекту -> Властивості -> Компоновщик -> Введення -> Додаткові залежності (ориг. Project Properties -> Linker -> Input -> Additional dependencies): введеіте ім'я .lib. Наприклад: opengl32.lib
В Властивості -> Компоновщик -> Загальні -> Додаткові каталоги бібліотек (ориг. Project Properties -> Linker -> General -> Additional library directories) переконайтеся, що заданий шлях до зазначеної бібліотеці.
Збірка, запуск і налагодження
Задайте робочий каталог (ту, де розташовані ваші текстури і шейдери): Властивості -> Налагодження -> Робочий каталог (ориг. Project Properties -> Debugging -> Working directory)
Запуск: Shift-F5; але вам, ймовірно, ніколи не знадобиться це робити. Замість цього - Налагодження: F5
Короткий список гарячих клавіш для налагодження:
- F9 на рядку або шелчёк зліва від номера рядка: установка точки зупинки. З'явиться червона точка.
- F10: виконати поточний рядок
- F11: виконати поточний рядок, але заходити в функції, які викликаються на цьому рядку ( "крок з заходом")
- Shift-F11: виконати до кінця функції ( "крок з виходом")
У вас також є багато налагоджувальних вікон: спостерігаються змінні, стек викликів, потоки, ...
QtCreator
QtCreator доступний безкоштовно за посиланням http://qt-project.org/ .
Створення нового проекту
Використовуйте простий C або C ++ проект; уникайте шаблонів, заповнених матеріалом Qt.
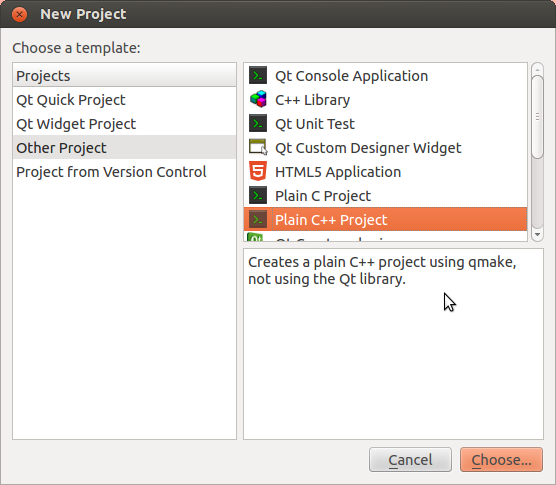
використовуйте параметри за замовчуванням.
Додавання файлів вихідних кодів в проект
Використовуйте графічний інтерфейс або додайте файли в файл .pro:
SOURCES + = main.cpp \ other.cpp \ foo.cpp
Додавання каталогів включення файл
У файлі .pro:
<Code> INCLUDEPATH + = <your path> \ <other path> </ code>
Зв'язок з бібліотекою
Клацніть правою кнопкою миші по проекту -> Add library
- Якщо ви використовуєте Linux ви встановили бібліотеку за допомогою apt-get або подібних чином, є ймовірність, що бібліотека зареєструвалася в системі. Вам потрібно вибрати "System package" і вказати ім'я бібліотеки (наприклад: libglfw або glew)
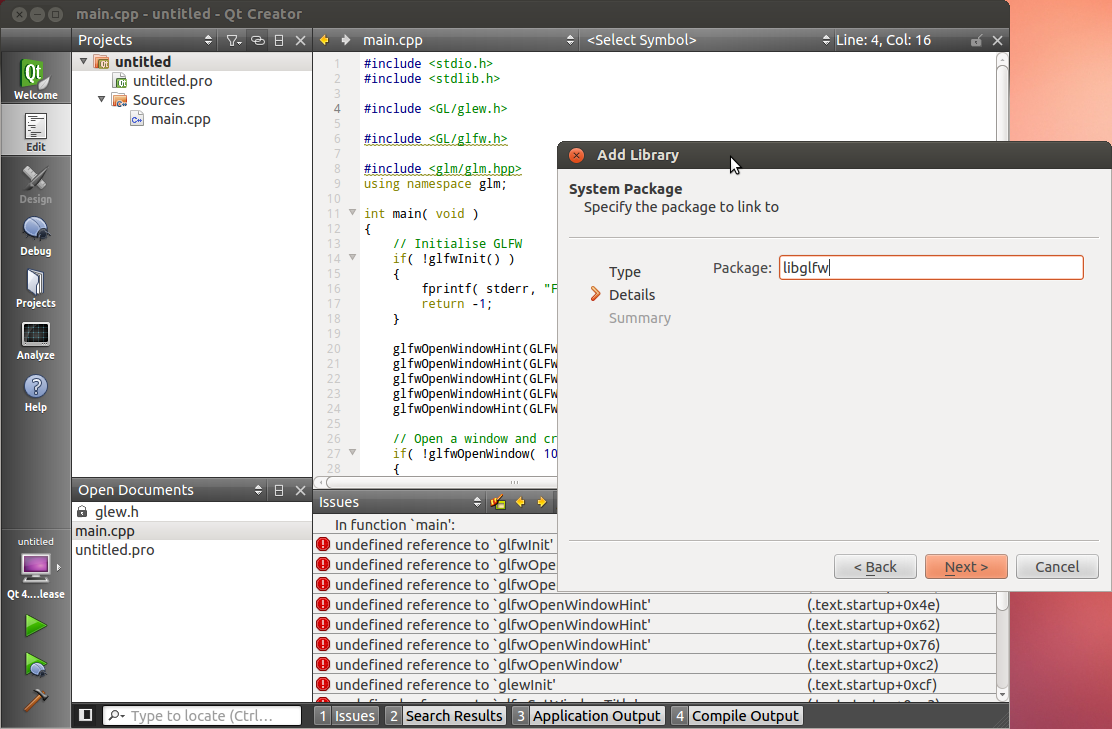
- Якщо немає, використовуйте «System Library». Указ, куди ви її скомпілювали.
Збірка, запуск і налагодження
Збірка: Ctrl-B, або іконка молотка в нижньому лівому кутку.
Запуск: іконка із зеленою Стрек. Ви можете вказати параметри командного рядка програми та робочий каталогв Projects -> Run Settings
Отладкаg:
- Установка точки зупинки: шелчёк зліва від номера рядка. З'явиться червона точка.
- F10: виконати поточний рядок
- F11: виконати поточний рядок, але заходити в функції, які викликаються на цьому рядку ( "крок з заходом")
- Shift-F11: виконати до кінця функції ( "крок з виходом")
У вас також є багато налагоджувальних вікон: спостерігаються змінні, стек викликів, потоки, ...
XCode
В розробці…
Створення нового проекту
Додавання файлів вихідних кодів в проект
Додавання каталогів включення файл
Зв'язок з бібліотекою
Збірка, запуск і налагодження
CMake
CMake створює проекти практично для будь-якого інструменту побудови програмного забезпечення: Visual, QtCreator, XCode, make, Code :: Blocks, Eclipseб і т.д. на будь-який ОС. він звільняє вас від необхідності підтримувати безліч файлів проектів.
Створення нового проекту
Створіть файл CMakeLists.txt і додайте в нього наступне (доробіть при необхідності):
cmake_minimum_required (VERSION 2.6) project (your_project_name) find_package (OpenGL REQUIRED) add_executable (your_exe_name tutorial04_colored_cube / tutorial04.cpp common / shader.cpp common / shader.hpp)
Запустітье CMake GUI, знайдіть ваш .txt файл і виберіть каталог для збирання. Клацніть Configure, потім Generate. Ваше рішення буде створено в каталозі для збірки.
Додавання файлів вихідних кодів в проект
Просто додати рядок в команді add_executable.
Додавання каталогів включення файл
include_directories (external / AntTweakBar-1.15 / include / external / glfw-2.7.2 / include / external / glm-0.9.1 / external / glew-1.5.8 / include /.)
Зв'язок з бібліотекою
set (ALL_LIBS $ {OPENGL_LIBRARY} GLFW_272 GLEW_158 ANTTWEAKBAR_151_OGLCORE_GLFW) target_link_libraries (tutorial01_first_window $ {ALL_LIBS})
Збірка, запуск і налагодження
CMake цього не робить. використовуйте вашу улюблену середу розробки.
make
Будь ласка, просто не використовуй це.
gcc
Можливо, варто скомпілювати невеликий проект "вручну", щоб краще зрозуміти робочий процес. Тільки не роби цього на реальному проекті ...
Зауважте, що Ви також можете зробити це в Windows за допомогою mingw.
Скомпілюйте кожен .cpp файл окремо:
g ++ -c main.cpp g ++ -c tools.cpp
Як було сказано вище, у вас будуть файли main.o і tools.o. Зв'яжіть їх:
з'явитися файл a.out; Це ваш виконуваний файл, запустіть його:
От і все !
Озброївшись цими знаннями, ми можемо почати створювати власне OpenGL додаток.
- Скачайте залежності: тут ми використовуємо GLFW, GLEW і GLM, але в залежності від вашого проекту, вам може знадобитися щось інше. Бажано зберігати в підкаталог вашого проекту (наприклад: external /)
- Вони повинні бути попередньо скомпільовані для вашої платформи. Однак GLM не обов'язково компілювати.
- Створіть новий проект в обраній вами середовищі розробки
- Додайте новий .cpp файл в проект
- Copy and paste, for instance, the following code (this is actually playground.cpp):
- Скопіюйте та вставте, наприклад, наступний код (це фактично playground.cpp):
#include <stdio.h> #include <stdlib.h> #include <GL / glew.h> #include <GL / glfw.h> #include <glm / glm.hpp> using namespace glm; int main (void) {// Ініціалізація GLFW if (! glfwInit ()) {fprintf (stderr, "Failed to initialize GLFW \ n"); return - 1; } GlfwOpenWindowHint (GLFW_FSAA_SAMPLES, 4); glfwOpenWindowHint (GLFW_WINDOW_NO_RESIZE, GL_TRUE); glfwOpenWindowHint (GLFW_OPENGL_VERSION_MAJOR, 3); glfwOpenWindowHint (GLFW_OPENGL_VERSION_MINOR, 3); glfwOpenWindowHint (GLFW_OPENGL_PROFILE, GLFW_OPENGL_CORE_PROFILE); // Відкриття вікна і створення його OpenGL контексту if (! GlfwOpenWindow (1024, 768, 0, 0, 0, 0, 32, 0, GLFW_WINDOW)) {fprintf (stderr, "Failed to open GLFW window. If you have an Intel GPU, they are not 3.3 compatible. Try the 2.1 version of the tutorials. \ n "); glfwTerminate (); return - 1; } // Ініціалізація GLEW if (glewInit ()! = GLEW_OK) {fprintf (stderr, "Failed to initialize GLEW \ n"); return - 1; } GlfwSetWindowTitle ( "Playground"); // Переконайтеся, що ми можемо захопити клавішу escape при натисканні нижче glfwEnable (GLFW_STICKY_KEYS); // Темно синій фон glClearColor (0.0 f, 0.0 f, 0.3 f, 0.0 f); do {// Нічого не малюйте, побачимося в уроці № 2! // Міняємо буфери glfwSwapBuffers (); } // Перевіряємо, чи була натиснута клавіша ESC або вікно було закрито while (glfwGetKey (GLFW_KEY_ESC)! = GLFW_PRESS && glfwGetWindowParam (GLFW_OPENED)); // Закриваємо вікно OpenGL і завершуємо GLFW glfwTerminate (); return 0; }
- Скомпілюйте проект.
У вас буде багато помилок компіляції. Ми проаналізуємо їх все, по одній.
The error messages below are for Visual Studio 2010 but they are more or less similar on GCC.
Visual Studio - fatal error C1083: Can not open filetype file: 'GL / glew.h': No such file or directory
(Or whichever other file)
Some headers are in weird locations. For instance, GLEW include files are located in external / glew-xyz / include /. The compiler has no way to magically guess this, so you have to tell him. In the project settings, add the appropriate path in the COMPILER (not linker) options.
Under no circumstance you should copy files in the compiler's default directory (Program Files / Visual Studio / ...). Technically, this will work, but it's very bad practice.
Also, it's good practice to use relative paths (./external/glew/... instead of C: / Users / username / Downloads / ...)
As an example, this is what the tutorial's CMake use:
external / glfw-2.7.2 / include external / glm-0.9.1 external / glew-1.5.8 / include
Repeat until all files are found.
GCC - fatal error: GL / glew.h: No such file or directory
(Or whichever other file)
This means that the library is not installed. If you're lucky, the library is well-known and you just have to install it. This is the case for GLFW, GLEW and GLM:
sudo apt-get install libglfw-dev libglm-dev libglew1.6-dev
If this is not a widespread library, see the answer for Visual Studio above.
Visual Studio - error LNK2019: unresolved external symbol glfwGetWindowParam referenced in function main
(Or whichever other symbol in whichever other function)
Congratulations! You have a linker error. This is excellent news: this means that the compilation succeeded. Just one last step!
glfw functions are in an external library. You have to tell the linker about this library. Add it in the linker options. Do not forget to add the path to the library.
As an example, this is what the Visual project use. The names are a bit unusual because this is a custom build. What's more, GLM does not need to be compiled or linked, so it's not here.
external \ Debug \ GLFW_272.lib external \ Debug \ GLEW_158.lib
If you download these libraries from SourceForge ( GLFW , GLEW ) And build a library yourself, you have to specify the correct path. For instance:
C: \ Where \ You \ Put \ The \ Library \ glfw.lib C: \ Where \ You \ Put \ The \ Other \ Library \ glew32.lib
GCC - main.cpp: undefined reference to `glfwInit '
(Or whichever other symbol in whichever other file)
Same answer than for Visual Studio.
Note that on Linux, GLFW and GLEW (and many others) are usually installed with apt-get or similar: sudo apt-get install libglew-dev libglfw-dev (may vary). When you do that, the library is copied in the compiler's standard directory, so you do not have to specify the path. Just link to glfw and glew as shown in the 1rst section.
I set everything right, but I still have an "unresolved external symbol" error!
This might me tricky to track down. Here are several options:
I have a linker error with _imp_glewInit or some other symbol that begins with _imp
This means that the library (in this case, glew) has been compiled as a static library, but you're trying to use it as a dynamic library . Simply add the following preprocessor directive in your compiler's options (for your own project, not glew's):
I have some other weird problem with GLFW
Maybe GLFW was built as a dynamic library, but you're trying to use it as a static one?
Try adding the following preprocessor directive:
I have another linker problem! Help me, I'm stuck!
Please send us a detailed report and a fully featured zipped project, and we'll add instructions.
Let's say you're the author of GLFW. You want to provide the function glfwInit ().
When building it as a DLL, you have to tell the compiler that glfwInit () is not like any other function in the DLL: it should be seen from others, unlike glfwPrivateImplementationMethodNobodyShouldCareAbout (). This is done by declaring the function "external" (with GCC) or "__declspec (dllexport)" (with Visual).
When you want to use glfw, you need to tell the compiler that this function is not really available: it should link to it dynamically. This is done by declaring the function "external" (with GCC) or "__declspec (dllimport)" (with Visual).
So you use a handy #define: GLFWAPI, and you use it to declare the functions:
GLFWAPI int glfwInit (void);
- When you're building as a DLL, you #define GLFW_BUILD_DLL. GLFWAPI then gets # define'd to __declspec (dllexport)
- When you're using GLFW as a DLL, you #define GLFW_DLL. GLFWAPI then gets # define'd to __declspec (dllimport)
- When you're building as a static lib, GLFWAPI is # define'd to nothing
- When you're using GLFW as a static lib, GLFWAPI is # define'd to nothing.
So the rule is: these flags must be consistent. If you build a lib (any lib, not just GLFW) as a DLL, use the right preprocessor definition: GLFW_DLL, GLEW_STATIC
My program crashes!
There are many reasons why a C ++ OpenGL application might crash. Here are a few. If you do not know the exact line where your program crashes, learn how to use a debugger (see shortcuts above). PLEASE do not debug with printf ().
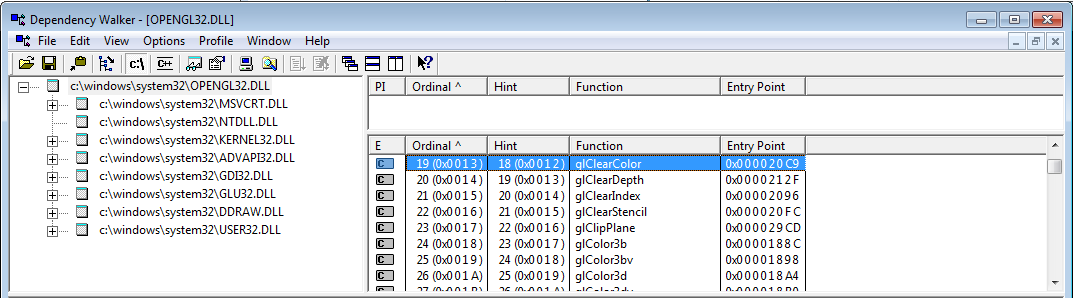
I do not even go inside main ()
This is most probably because some dll could not be found. Try opening your application with Dependency Walker (Windows) or ldd (Linux; try also this )
My program crashes on glfwOpenWindow (), or any other function that creates an OpenGL context
Several possible reasons:
- Your GPU does not support the requested OpenGL version. Try to see the supported version with GPU Caps Viewer or similar. Update driver if it seems too low. Integrated Intel cards on netbooks especially suck. Use a lower version of OpenGL (2.1 for instance), and use extensions if you lack features.
- Your OS does not support the requested OpenGL version: Mac OS ... same answer.
- You're trying to use GLEW with an OpenGL Core context (ie without all the deprecated stuff). This is a GLEW bug. Use glewExperimental = true before glewInit (), or use a compatibility profile (ie use GLFW_OPENGL_COMPAT_PROFILE instead of GLFW_OPENGL_CORE_PROFILE)
My program crashes on the first OpenGL call, or on the first buffer creation
Three possible reasons:
- You're not calling glewInit () AFTER glfwOpenWindow ()
- You're using a core OpenGL profile, and you did not create a VAO. Add the following code after glewInit ():
GLuint VertexArrayID; glGenVertexArrays (1, & VertexArrayID); glBindVertexArray (VertexArrayID);
- You're using the default build of GLEW, which has a bug. You can not use a Core OpenGL Profile due to this bug. Either Use glewExperimental = true before glewInit (), or ask GLFW for a Compatibility Profile instead:
glfwOpenWindowHint (GLFW_OPENGL_PROFILE, GLFW_OPENGL_COMPAT_PROFILE);
My program crashes when I try to load some file
Setup your working directory correctly. See Tutorial 1.
Create a test.txt file and try the following code:
if (fopen ( "test.txt", "r") == NULL) {printf ( "I'm probably running my program from a wrong folder"); }
USE THE DEBUGGER !!!! Seriously! Do not debug with printf (); use a good IDE. http://www.dotnetperls.com/debugging is for C # but is valid for C ++ too. Will vary for XCode and QtCreator, but concepts remain exactly the same.
Something else is wrong
Please contact us by mail